
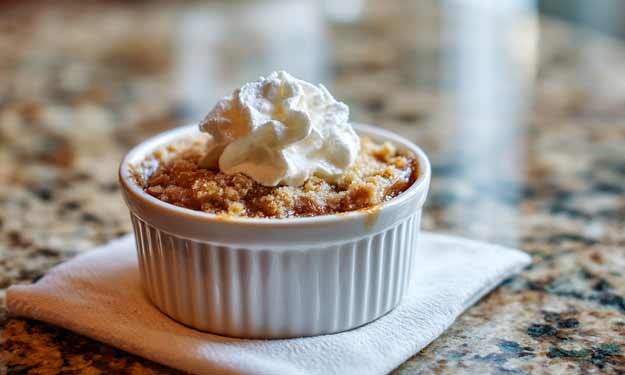
Old-Fashioned Apple Crisp
I feel like apple crisp is one of those classic old-fashioned desserts that always takes me back to a younger me. When my mom made it, I couldn’t wait for it to come out of the oven. We couldn’t eat any until it cooled, but I would always sneak pieces of the topping.
And when it was cooled enough to eat those fresh sliced apples, we’d top the apple crisp with vanilla ice cream or whipped cream. It was so divine and when I was older and started making it myself, I’d sneak a little caramel drizzle on it too.
Apple crisp is a favorite for young and old alike. It’s an indulgent and delicious fall treat.
Ingredients for Apple Crisp
Filling
- 5 cups fresh apples, sliced
- 1/2 cup granulated white sugar
- 1/2 teaspoon cinnamon
- 1 teaspoon vanilla extract
Topping
This isn’t your typical crumbly topping - the melted butter blends everything together so it bakes up golden, buttery, and just slightly crisp around the edges.
- 1/2 cup all-purpose flour
- 1/3 cup old fashioned oats
- 2/3 cup packed brown sugar
- 1/4 teaspoon salt
- 1/2 teaspoon cinnamon
- 1/4 cup (1/2 stick) butter, melted
Note: One time I used a packet of blueberry instant oatmeal instead of the old fashioned oats (didn't have these on the shelf) - it gave the crisp a subtle fruity flavor that was actually really good!
Instructions for Apple Crisp
- Preheat oven to 350°F. I butter an 8 x 8 inch glass baking dish (you can use something similar like a deep dish casserole) and set aside. If you prefer, you can use a cooking spray.
- Combine the sliced apples with the sugar, cinnamon, and vanilla extract in a large bowl and mix until all the apples are evenly coated. Transfer to the prepared baking dish.
- In a separate medium size bowl, combine the flour, oats, brown sugar, salt, and cinnamon. Pour in the melted butter and stir until everything is well coated. Add the mixture evenly over the top of the apples.
- Bake in the preheated oven for 45 to 55 minutes, until bubbly and the topping is golden brown. Allow to cool slightly before serving.
- Serve warm with vanilla ice cream or whipped cream on top.
- Store leftovers in the refrigerator and reheat leftovers at 325°F for about 10 minutes to bring back the crisp texture.
Tips for Making Apple Crisp
Here are a few simple tips that make all the difference when it comes to getting that perfect apple crisp - golden, bubbly, and full of flavor.
What Apples to Use
- The best apples for apple crisp are firm, tart varieties like Granny Smith or Honeycrisp - they hold their shape better.
- For a balanced flavor and texture, mix a tart apple with a sweeter, softer one like Golden Delicious or Fuji.
- Avoid softer apples like Red Delicious, as they tend to become mushy and overly sweet when cooked
- These were all I had and what I used and although the apple crisp was delicious, it was a bit too sweet - thankfully I checked the crisp and noticed it was done early so the apples didn’t get mushy.
Peeling or Not Peeling the Apples
- It’s totally up to you, but I take the time to peel the apples first because the skin doesn’t cook as softly as the apples do.
Slice Apples Evenly
- If you’re slicing apples by hand, try to keep them as even as possible so they cook at the same rate. For best results, I use my apple slicer.
Prevent the Topping from Browning Too Much
- Every oven I’ve ever used cooks differently, so when it’s close to the time the apple crisp is done, check the topping.
- If it’s starting to look too brown, place a tented piece of aluminum foil over the top and continue baking until the apples are bubbly and tender.
Options
- Add in Some Nuts: If you like, you can add in chopped or sliced pecans or walnuts to the topping for extra crunch.
- If Watching Sugar: If you are watching your sugar intake, it’s fine to cut the sugar back a bit in either the filling or the topping.
Making Homemade Apple Crisp
There’s just something special about apple crisp - the way it fills the house with that warm cinnamon smell and makes you slow down for a moment. Whether it’s for a weekend dessert or a holiday gathering, it always brings a little comfort and nostalgia to the table.
Simple ingredients, a few good apples, and a touch of sweetness - that’s all it takes to make something that feels like home.
Recipe Card
Homemade Apple Crisp

Servings: Depends on how much you eat per serving.
Prep Time: 30 minutes
Cook Time: 50 minutes
Total Time: 1 hour 30 minutes
Ingredients
- 5 cups fresh apples, sliced
- 1/2 cup granulated white sugar
- 1/2 teaspoon cinnamon
- 1 teaspoon vanilla extract
- 1/2 cup all-purpose flour
- 1/3 cup old fashioned oats
- 2/3 cup packed brown sugar
- 1/4 teaspoon salt
- 1/2 teaspoon cinnamon
- 1/4 cup (1/2 stick) butter, melted
Instructions
- Preheat oven to 350°F. I butter an 8 x 8 inch glass baking dish (you can use something similar like a deep dish casserole) and set aside. If you prefer, you can use a cooking spray.
- Combine the sliced apples with the sugar, cinnamon, and vanilla extract in a large bowl and mix until all the apples are evenly coated. Transfer to the prepared baking dish.
- In a separate medium size bowl, combine the flour, oats, brown sugar, salt, and cinnamon. Pour in the melted butter and stir until everything is well coated. Add the mixture evenly over the top of the apples.
- Bake in the preheated oven for 45 to 55 minutes, until bubbly and the topping is golden brown. Allow to cool slightly before serving.
- Serve warm with vanilla ice cream or whipped cream on top.
- Store leftovers in the refrigerator and reheat leftovers at 325°F for about 10 minutes to bring back the crisp texture.
Optional
Add in Some Nuts: If you like, you can add in chopped or sliced pecans or walnuts to the topping for extra crunch.
If Watching Sugar: If you are watching your sugar intake, it’s fine to cut the sugar back a bit in either the filling or the topping.
Notes
What Apples to Use
- The best apples for apple crisp are firm, tart varieties like Granny Smith or Honeycrisp - they hold their shape better.
- For a balanced flavor and texture, mix a tart apple with a sweeter, softer one like Golden Delicious or Fuji.
- Avoid softer apples like Red Delicious, as they tend to become mushy and overly sweet when cooked
- These were all I had and what I used and although the apple crisp was delicious, it was a bit too sweet - thankfully I checked the crisp and noticed it was done early so the apples didn’t get mushy.
Peeling or Not Peeling the Apples
It’s totally up to you, but I take the time to peel the apples first because the skin doesn’t cook as softly as the apples do.
Slice Apples Evenly
If you’re slicing apples by hand, try to keep them as even as possible so they cook at the same rate. For best results, I use my apple slicer.
Prevent the Topping from Browning Too Much
- Every oven I’ve ever used cooks differently, so when it’s close to the time the apple crisp is done, check the topping.
- If it’s starting to look too brown, place a tented piece of aluminum foil over the top and continue baking until the apples are bubbly and tender.